MTU and TCP MSS when using PPPoE

I switched to Bell from Rogers about half a year ago. A goal I had was to remove their router and use my own EdgeRouter Pro. Once I got the PPPoE connection up I was able to ping the rest of the world but couldn't load most websites. Eventually I found I had to adjust the MTU and add MSS clamping to get everything to work. At the time just blindly used MTU and MSS clamp values I found online. They turned out to be correct but last night I decided to experiment and research to find the correct values I should be using.

Finding the MTU

First you should understand that almost all networking gear has their Maximum transmission unit set to 1500 bytes for each interface. The Ethernet header overhead (18 bytes1) is not included in this. This means that the payload inside the Ethernet frame can be at most 1500 bytes long.

What goes inside the payload of the frames depends on what you are doing. If you are pinging an IP, it would be a ICMP packet inside an IP packet so to figure out the largest ICMP packet size you can use, you subtract the size of the IP header (20 bytes2) and the ICMP header (8 bytes) from the MTU: 1500 - 20 - 8 = 1472.

Throw in some PPPoE

Now if you tried to ping with the Don't fragment (DF) flag set, a packet size of 1472 should work and a packet size of 1473 should not work. Like this (on Linux):

$ ping -M do -s 1473 8.8.8.8
PING 8.8.8.8 (8.8.8.8) 1473(1501) bytes of data.
ping: local error: Message too long, mtu=1500

$ ping -M do -s 1472 8.8.8.8
PING 8.8.8.8 (8.8.8.8) 1472(1500) bytes of data.
1480 bytes from 8.8.8.8: icmp_seq=1 ttl=51 time=1.27 ms
1480 bytes from 8.8.8.8: icmp_seq=2 ttl=51 time=24.3 ms
1480 bytes from 8.8.8.8: icmp_seq=3 ttl=51 time=1.31 ms
1480 bytes from 8.8.8.8: icmp_seq=4 ttl=51 time=1.77 ms

That is unless you're connecting over PPPoE. If you are using PPPoE you will find that your ping will fail with a packet size of 1472. This is because PPPoE has its own packet header of 8 bytes. If you subtract the PPPoE header from our previous value you will get the actual largest ICMP packet size: 1472 - 8 = 1464. Now you can try pinging with the new packet size, like this (on Mac):

$ ping -D -s 1465 8.8.8.8
PING 8.8.8.8 (8.8.8.8): 1465 data bytes
ping: sendto: Message too long
Request timeout for icmp_seq 0
ping: sendto: Message too long
Request timeout for icmp_seq 1
ping: sendto: Message too long
Request timeout for icmp_seq 2
ping: sendto: Message too long
Request timeout for icmp_seq 3

$ ping -D -s 1464 8.8.8.8
PING 8.8.8.8 (8.8.8.8): 1464 data bytes
1472 bytes from 8.8.8.8: icmp_seq=0 ttl=59 time=6.844 ms
1472 bytes from 8.8.8.8: icmp_seq=1 ttl=59 time=7.066 ms
1472 bytes from 8.8.8.8: icmp_seq=2 ttl=59 time=7.066 ms
1472 bytes from 8.8.8.8: icmp_seq=3 ttl=59 time=7.229 ms
1472 bytes from 8.8.8.8: icmp_seq=4 ttl=59 time=7.081 ms

What is MSS clamping?

Normally your computer will be able to determine a safe MTU using Path MTU Discovery (PMTUD) but this relies on your ISP actually sending back ICMP Too Big packets. Unfortunately Bell has decided (in their infinite wisdom) that this is not a good thing (probably under the guise of "security") so they leave you high and dry because your TCP connections may end up as "black hole connections"; this happens when the TCP handshake works but trying to send any data just gets dropped silently on their side.

The solution for this is called MSS clamping. You use your firewall to override the Maximum Segment Size (MSS) option on all TCP connections so they do not have issues with packets being too large. To figure out the MSS you want, you take the standard 1500 MTU and subtract the PPPoE header, the IP header, and the TCP header (20 bytes3): 1500 - 8 - 20 - 20 = 1452.

EdgeRouter

If you have an EdgeRouter, you'll want the following configuration options to set the MTU for your PPPoE connection and MSS clamping, where eth0 is the interface you are using and vif 35 is for VLAN 35.

set firewall options mss-clamp interface-type pppoe
set firewall options mss-clamp mss 1452
set interfaces ethernet eth0 vif 35 pppoe 0 mtu 1492

Conclusion

Blindly following values I found posted online worked but I wasn't satisfied. After some experimenting and reading Wikipedia, I now am confident in 1492 as the MTU and 1452 for the TCP MSS, and I understand why they work.

Notes:
  1. Ethernet frame headers start at 18 bytes long, grow to 22 bytes with VLAN tagging, and 26 bytes with Q-in-Q VLAN tagging.
  2. IP packet header start at 20 bytes long and can be up to 60 bytes if there are options specified; however, it is rarely used.
  3. Like IP, TCP packet headers start at 20 bytes long and can be up to 60 bytes if there are options.
Matrox Mojito Max and Matrox VS4 are not compatible

One would think that similar products from the same company would be compatible but with Matrox, that is woefully wrong. A few months ago we bought 2 Matrox Mojito MAX cards because I had assumed the BlackMagic Intensity Pro cards we were using were bad (turns out it was the motherboard). They worked great for capturing HDMI except we could never get it to capture the HD-SDI signal from our Canon XF105. My desire to use the BNC connector drove me to buying the Matrox VS4 because it claimed it did resolution and frame rate detection and it did in fact deliver on that promise. When plugging in the camera with HD-SDI we found that it did indeed work which was relieving and we quickly identified the cable as the problem. However there was a huge snag, we were forced to uninstall the Mojito MAX drivers to use the card and when trying to reinstall them, we were forced to uninstall the VS4 drivers. A quick call to Matrox customer support confirmed that the cards are not compatible and attempting to manually install the drivers caused BSoD on our livestreaming rig. The return process was pretty painfree.

I'm planning on doing a bunch of posts about what I've learned does and does not work for livestreaming company events in the coming weeks. So stay tuned.

PhidgetSBC3 and D-Link DWA-160

There's actually a much easier way of doing this. Just apt-get install firmware-linux-free and boom! You get the carl9170 firmware and the DWA-160 is recognized.

I recently got my hands on a PhidgetSBC3 and plugged a D-Link DWA-160 into and found that it already had support built into the kernel but it had an error. So I went searching in the /lib/firmware directory and saw there was no carl9170-1.fw file. So I downloaded and when I plugged the DWA-160 back in it worked and correctly showed up in the web interface. Installing it is very easy:

apt-get install curl -y
curl -L http://linuxwireless.org/en/users/Drivers/carl9170/fw1.9.7?action=AttachFile&do=get&target=carl9170-1.fw > /lib/firmware/carl9170-1.fw

Send files to your trash in OS X from the command line

So yesterday I wrote a little Objective C tool that behaves like rm but instead sends the files or directories to your Trash using Finder. The code is available at samuelkadolph/trash. You can clone that repo and run make install or if you have homebrew you can run this:

brew install https://raw.github.com/samuelkadolph/homebrew/add_trash_formula/Library/Formula/trash.rb

StartSSL cert with mumble-server on Ubuntu 12.04

With the release of Ubuntu 12.04 I decided to upgrade the server running my mumble server and I wanted to use my new wildcard certificate so my mumble server would have a nice shiny green background. All went well with my upgrade to 12.04 and getting nginx to use my certificate was easy. Next was to add my certificate to mumble and then I ran into a problem. No matter what certificates I provided to the config (sslCert and sslCA) I would always get his error when a client tried to connect.

1 => <1:(-1)> New connection: XXX.XXX.XXX.XXX:XXXXX
1 => <1:(-1)> SSL Error: No certificates could be verified
1 => <1:(-1)> Connection closed: [-1]

Long story short: I added the ca-bundle.pem from StartSSL to /etc/ssl/certs and then it all worked.

jruby with 1.9 mode as the default with rvm

Thanks to recent commits from Wayne, you can now pass a build flag when install jruby with rvm and it will build jruby instead of downloading a prebuilt copy. Make sure you rvm get head && rvm reload first. Then we can install jruby with 1.9 mode as the default:

rvm install jruby -C -Djruby.default.ruby.version=1.9

And if you want to use jruby-head:

rvm install jruby-head -C -Djruby.default.ruby.version=1.9

Cocoa Entitlements and EXC_BAD_INSTRUCTION

So I've been playing around with Lion sandboxing and using entitlements for a Cocoa app. (In case you didn't hear, all apps submitted to the App Store have to be sandboxed come this November.) The first thing you may notice when you enable sandboxing for your app in Xcode is that it turns on code signing. It has to do this because entitlements don't work unless you sign your code. Once code signing is turned on and you try to compile you may get an error:

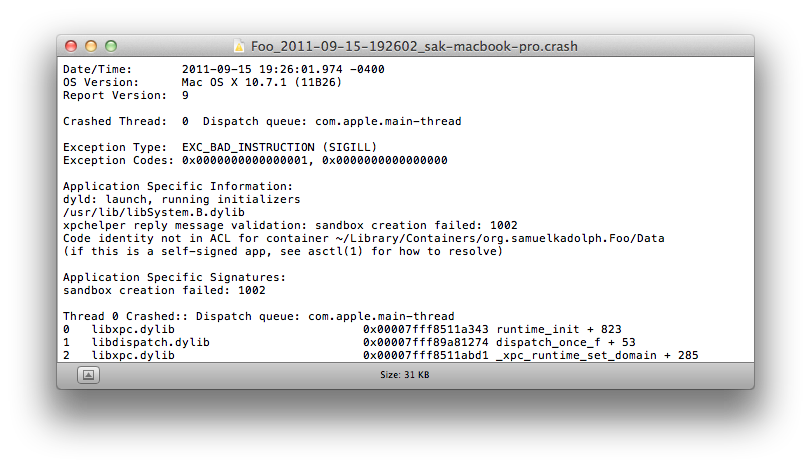
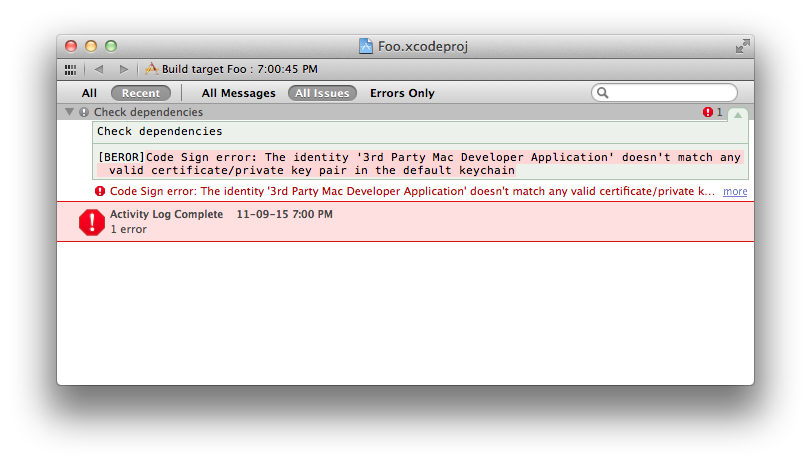
[BEROR]Code Sign error: The identity '3rd Party Mac Developer Application' doesn't match any valid certificate/private key pair in the default keychain

This because by default Xcode will try to sign your code with an identity in your keychain that starts with 3rd Party Mac Developer Application. To be able to submit apps to the App Store you have to get a certificate from Apple so this is a sane default but I wasn't signed up of the Mac Developer Program. I was however signed up for the iOS Developer Program so to fix the error for now I changed the Code Signing Identity build setting to iPhone Developer and away I went.

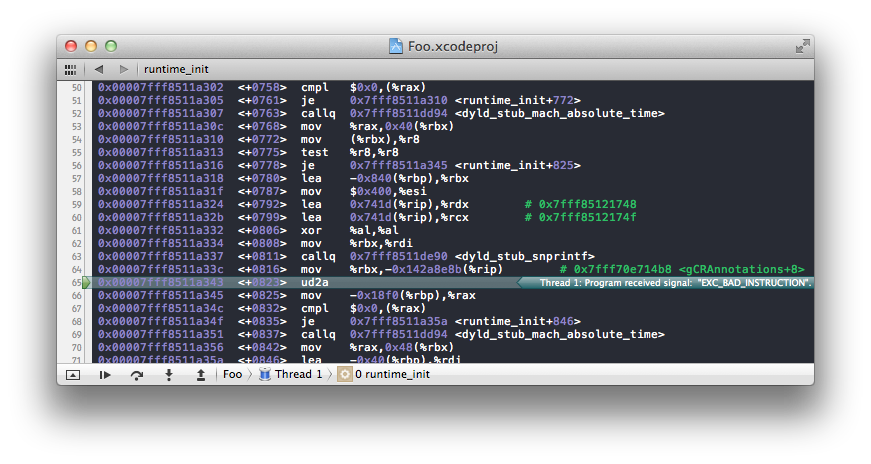
Fast forward a few days after I had signed up for the Mac Developer Program and I got my certificate. So I got rid of my change Code Signing Identity and restored the default. But I soon ran into a problem, my application now crashed while starting up no matter what I changed with a EXC_BAD_INSTRUCTION error in some random Apple code.

I quickly localized the problems to having entitlements on but the non-existance of any documentation on debugging sandbox errors from Apple I was frustrated. So I fired up my application without Xcode so there would be a error trace I could view in Console. This was a great idea because I was actually able to see what was the error was.

What immediately jumped out at me was

Code identity not in ACL for container ~/Library/Containers/org.samuelkadolph.Foo/Data

and I suddenly remembered something I read in the sandbox documentation. By default in the Lion sandbox, you can only access files in a special directory under ~/Library/Containers which is named after the bundle identifier for your app. And it's protected to prevent someone from accessing the data in there with a fake app. This protection is achieved by using info from the app which was signed by your code signing identity to confirm a genuine app from a fake. So when I changed the keychain identity used to sign the code I was creating a fake app and trying to access the data.

The solution was simple after determining that was the problem. Just delete the container for your app (and only your app, every other sandboxed app has a container too and may store data in them). In my case it was rm -rf ~/Library/Containers/org.samuelkadolph.Foo.

It's unfortunate that Xcode isn't more helpful with this error and unfortunate that OS X will kill (with SIGKILL too) an application instead of using some error handling in the app itself. I hope this post helps you if you ever run into this problem.

Parsing Proxy Auto-Config files

One thing I've always been wanting to be able to do was parse a proxy auto-config file from the command line.

I only recently found the pacparser library but found it limiting because it isn't easy to install and use. So I decided to write a rubygem that would parse a pac file.

I started using the execjs gem but one thing I quickly figured out is that you cannot implement all of the pac functions in pure JavaScript. Most notably is the dnsResolve(host) function which you cannot write in JavaScript because it lacks a way to make DNS queries.

So I took the code from execjs that deals with the four native runtimes and modified it to make ruby methods available in the JavaScript runtime. And now it's available in the pac gem.

You will need a JavaScript runtime installed to be able to use the pac gem, I recommend therubyracer gem for ruby and therubyrhino for jruby. johnson only works with ruby 1.8 and mustang requires the v8 library to be installed.

gem install therubyracer pac

And now you can use the parsepac executable.

parsepac http://cloud.github.com/downloads/samuelkadolph/ruby-pac/sample.pac http://samuel.kadolph.com

Or in ruby.

require "rubygems"
require "pac"

pac = PAC.load("http://cloud.github.com/downloads/samuelkadolph/ruby-pac/sample.pac")
pac.find("http://samuel.kadolph.com") # => "DIRECT"

pac = PAC.read("sample.pac")

pac = PAC.source <<-JS
  function FindProxyForURL(url, host) {
    return "DIRECT";
  }
JS

Introducing TrueCrypt Mounter for OS X

After playing around with using TrueCrypt and syncing the volume over Dropbox I was disappointed to discover that it doesn't let you mount the volume by double clicking on the file. You have to open TrueCrypt, select the file and then type in your password.

To further expand my knowledge of OS X application bundles I set out to write an application that associated with the .tc file extension and when you opened a .tc file it would prompt your for your password and once you are done and eject the disk, automatically dismount the TrueCrypt volume.

The fruit of my labour is available in this GitHub repository and you can download the application here. Once you have copied the application to your Applications directory, it will associate with any *.tc file. You must add this extension to any of your TrueCrypt volumes because (unfortunately) TrueCrypt does not do this for you automatically.

Speeding up jruby with nailgun

I had always wondered why when I installed jruby using rvm it always built something called Nailgun but I never bothered to search about it.

That was a mistake.

Nailgun is an amazing idea that greatly speeds up the start up time of the JVM and subsequently: jruby.

Without Nailgun

$ time jruby -e ''

real        0m1.336s
user        0m2.608s
sys         0m0.205s

With Nailgun

$ time jruby --ng -e ''

real        0m0.265s
user        0m0.001s
sys         0m0.003s

As you can see, nailgun reduced the start up time for jruby by 500%. Now you may be asking "How do I get started using nailgun?". Well, if you are using rvm then all you need to do is enable the after_use_jruby hook which will start up a nailgun server for you.

    chmod +x "$rvm_hooks_path/after_use" "$rvm_hooks_path/after_use_jruby"

And that's all you need to do. rvm jruby or rvm use jruby will now start up a nailgun server if there isn't one running and it set the --ng switch for all jruby runs.

If you aren't using rvm, you will have to compile nailgun and start up a nailgun server with jruby --ng-server. Now whenever you run jruby you just add the --ng switch and it will use the nailgun server. You may want to export JRUBY_OPTS="--ng" to set the switch for all jruby runs.