Now that go is installed (see Part 1), you can get down to business and start using phidgets. I've written a go phidgets library (currently only InterfaceKit and IR phidgets are implemented, open an issue or pull request if you want more) at github.com/samuelkadolph/go/phidgets.
Category archives: Programming
Go on the PhidgetSBC3 Part 1
The latest version of the PhidgetSBC line includes an ARMv5 processor which means it now has support for go. Unfortunately the current golang package in the debian repository does not work but I was able to compile golang from source on the PhidgetSBC3 and it worked (including cgo). Thanks to the
"The Go Language Gophers" team I downloaded the golang-tip package and built it on my PhidgetSBC3. I've made this deb available in my apt repository so you can easily install go and get rocking.
PhidgetSBC2 and D-Link DWA-160
So I've had a little project going on with the foosball table at work: a system to detect when someone scores a goal. I've built a prototype photogate that goes inside of the goal. My design is to have 2 photogates hooked up to my PhidgetSBC2 and write some ruby code to detect a goal and send a message to a connected iPad app to indicate who scored. Everything was going fine until I took the PhidgetSBC2 to our foosball table and discovered our 2.4GHz network had no coverage there. Which means the wifi usb adapter I had for the PhidgetSBC2 was useless. Undeterred I started on 2 different solutions.
PhidgetSBC2 and ruby
Installing ruby (and the phidgets-ffi gem) on the PhidgetSBC2 is fairly simple. You will need to check Include full Debian Package Repository under System > Packages in the SBC admin page. And then just ssh into the server and run the following:
apt-get update && apt-get install ruby1.9.1 ruby1.9.1-dev build-essential -yAnd then you can install the phidgets-ffi gem like so:
gem1.9.1 install ffi phidgets-ffiThe gem doesn't find the libphidgetsbc.so.0 on the PhidgetSBC, so we need to symlink it to somewhere that the gem will find it.
ln -s /usr/lib/libphidget21.so.0 /usr/lib/libphidget21.soOnce we're done this we can test it with this:
ruby1.9.1 -rphidgets-ffi -e 'puts Phidgets::FFI.library_version'I also like to run this to add the ruby1.9.1 executables (i.e. rake, irb, gem) without the 1.9.1 suffix.
update-alternatives --install /usr/bin/ruby ruby /usr/bin/ruby1.9.1 400 \
--slave /usr/bin/erb erb /usr/bin/erb1.9.1 \
--slave /usr/bin/gem gem /usr/bin/gem1.9.1 \
--slave /usr/bin/rake rake /usr/bin/rake1.9.1 \
--slave /usr/bin/testrb testrb /usr/bin/testrb1.9.1 \
--slave /usr/bin/rdoc rdoc /usr/bin/rdoc1.9.1 \
--slave /usr/bin/irb irb /usr/bin/irb1.9.1
I also like to create an .gemrc to skip installing ri and rdoc documentation to save on space.
echo install: --no-rdoc --no-ri >> ~/.gemrc
echo update: --no-rdoc --no-ri >> ~/.gemrcSimple Rails Multi-Tenancy II
I suppose it's about time I updated my Simple Rails Multi-Tenancy post to use the latest rails 3.1.1. Not much has changed from the 3.0 beta to 3.1.1 in terms of the method I use to achieve multi-tenancy but the code has become a bit cleaner (but the patch required is a bit larger). This time around I'll skip the commands and just go straight to the code itself.
Faking an iOS Framework
Ever wanted to share your iOS code with others without having them copy your code and headers and hope it compiles properly? Well you can easily do that with frameworks. I had found several guides on how to do this but they were either out-of-date or incomplete. While the iOS App Store doesn't allow you include dynamic frameworks, you can create a relocatable static framework which functions very simliar with one key difference (more on this later). One more thing we can do to simplify distribution is to create a universal framework so that they same file works on the iOS device (armv7) and in the simulator (i386).
Let's get started by creating a new project in Xcode.
jruby with 1.9 mode as the default with rvm
Thanks to recent commits from Wayne, you can now pass a build flag when install jruby with rvm and it will build jruby instead of downloading a prebuilt copy. Make sure you rvm get head && rvm reload first. Then we can install jruby with 1.9 mode as the default:
rvm install jruby -C -Djruby.default.ruby.version=1.9And if you want to use jruby-head:
rvm install jruby-head -C -Djruby.default.ruby.version=1.9Cocoa Entitlements and EXC_BAD_INSTRUCTION
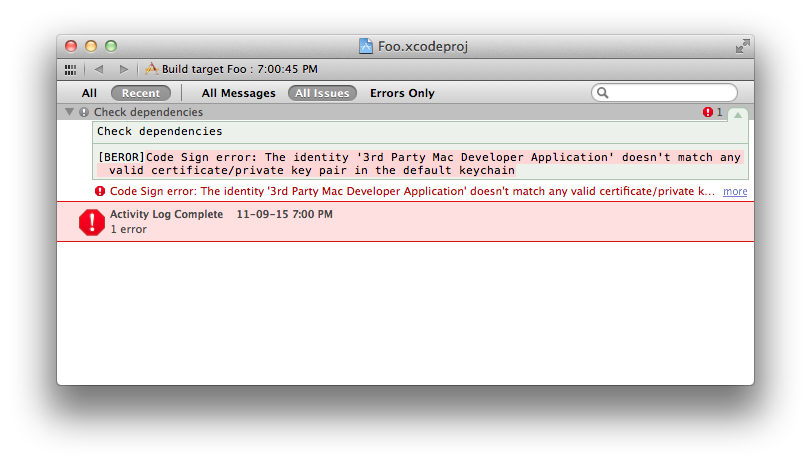
So I've been playing around with Lion sandboxing and using entitlements for a Cocoa app. (In case you didn't hear, all apps submitted to the App Store have to be sandboxed come this November.) The first thing you may notice when you enable sandboxing for your app in Xcode is that it turns on code signing. It has to do this because entitlements don't work unless you sign your code. Once code signing is turned on and you try to compile you may get an error:
[BEROR]Code Sign error: The identity '3rd Party Mac Developer Application' doesn't match any valid certificate/private key pair in the default keychainThis because by default Xcode will try to sign your code with an identity in your keychain that starts with 3rd Party Mac Developer Application. To be able to submit apps to the App Store you have to get a certificate from Apple so this is a sane default but I wasn't signed up of the Mac Developer Program. I was however signed up for the iOS Developer Program so to fix the error for now I changed the Code Signing Identity build setting to iPhone Developer and away I went.
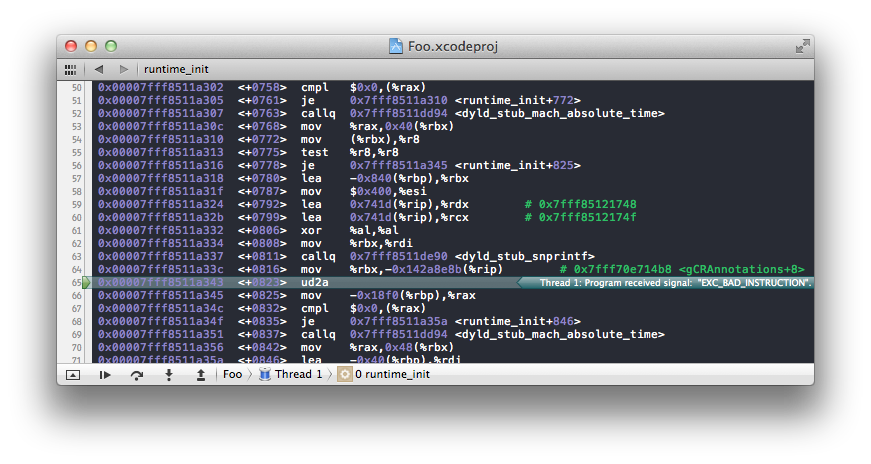
Fast forward a few days after I had signed up for the Mac Developer Program and I got my certificate. So I got rid of my change Code Signing Identity and restored the default. But I soon ran into a problem, my application now crashed while starting up no matter what I changed with a EXC_BAD_INSTRUCTION error in some random Apple code.
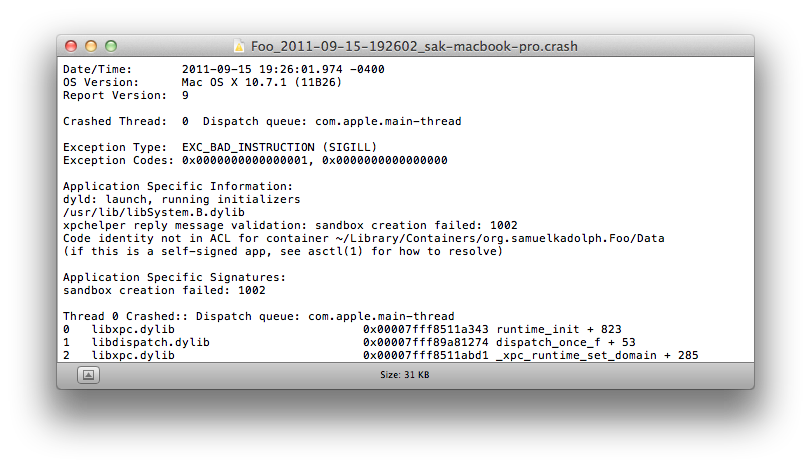
I quickly localized the problems to having entitlements on but the non-existance of any documentation on debugging sandbox errors from Apple I was frustrated. So I fired up my application without Xcode so there would be a error trace I could view in Console. This was a great idea because I was actually able to see what was the error was.
What immediately jumped out at me was
Code identity not in ACL for container ~/Library/Containers/org.samuelkadolph.Foo/Dataand I suddenly remembered something I read in the sandbox documentation. By default in the Lion sandbox, you can only access files in a special directory under ~/Library/Containers which is named after the bundle identifier for your app. And it's protected to prevent someone from accessing the data in there with a fake app. This protection is achieved by using info from the app which was signed by your code signing identity to confirm a genuine app from a fake. So when I changed the keychain identity used to sign the code I was creating a fake app and trying to access the data.
The solution was simple after determining that was the problem. Just delete the container for your app (and only your app, every other sandboxed app has a container too and may store data in them). In my case it was rm -rf ~/Library/Containers/org.samuelkadolph.Foo.
It's unfortunate that Xcode isn't more helpful with this error and unfortunate that OS X will kill (with SIGKILL too) an application instead of using some error handling in the app itself. I hope this post helps you if you ever run into this problem.
Parsing Proxy Auto-Config files
One thing I've always been wanting to be able to do was parse a proxy auto-config file from the command line.
I only recently found the pacparser library but found it limiting because it isn't easy to install and use. So I decided to write a rubygem that would parse a pac file.
I started using the execjs gem but one thing I quickly figured out is that you cannot implement all of the pac functions in pure JavaScript. Most notably is the dnsResolve(host) function which you cannot write in JavaScript because it lacks a way to make DNS queries.
So I took the code from execjs that deals with the four native runtimes and modified it to make ruby methods available in the JavaScript runtime. And now it's available in the pac gem.
You will need a JavaScript runtime installed to be able to use the pac gem, I recommend therubyracer gem for ruby and therubyrhino for jruby. johnson only works with ruby 1.8 and mustang requires the v8 library to be installed.
gem install therubyracer pacAnd now you can use the parsepac executable.
parsepac http://cloud.github.com/downloads/samuelkadolph/ruby-pac/sample.pac http://samuel.kadolph.comOr in ruby.
require "rubygems"
require "pac"

pac = PAC.load("http://cloud.github.com/downloads/samuelkadolph/ruby-pac/sample.pac")
pac.find("http://samuel.kadolph.com") # => "DIRECT"

pac = PAC.read("sample.pac")

pac = PAC.source <<-JS
  function FindProxyForURL(url, host) {
    return "DIRECT";
  }
JSSpeeding up jruby with nailgun
I had always wondered why when I installed jruby using rvm it always built something called Nailgun but I never bothered to search about it.
That was a mistake.
Nailgun is an amazing idea that greatly speeds up the start up time of the JVM and subsequently: jruby.
Without Nailgun
$ time jruby -e ''

real        0m1.336s
user        0m2.608s
sys         0m0.205s
With Nailgun
$ time jruby --ng -e ''

real        0m0.265s
user        0m0.001s
sys         0m0.003s
As you can see, nailgun reduced the start up time for jruby by 500%. Now you may be asking "How do I get started using nailgun?". Well, if you are using rvm then all you need to do is enable the after_use_jruby hook which will start up a nailgun server for you.
chmod +x "$rvm_hooks_path/after_use" "$rvm_hooks_path/after_use_jruby"And that's all you need to do. rvm jruby or rvm use jruby will now start up a nailgun server if there isn't one running and it set the --ng switch for all jruby runs.
If you aren't using rvm, you will have to compile nailgun and start up a nailgun server with jruby --ng-server. Now whenever you run jruby you just add the --ng switch and it will use the nailgun server. You may want to export JRUBY_OPTS="--ng" to set the switch for all jruby runs.


